Showing posts with label 3D crafts. Show all posts

Tuesday, March 11, 2025

Personalized Treat Boxes from Art Impressions

 Hello Ai fans!

At work I have a "Soup Group." There are 7 of us and every Thursday one of us makes lunch for the other 6 members. We do soups, stews and chili in the fall and winter, and switch to salads and things like pulled pork sandwiches with slaw in the warmer months.


 It was my turn last Thursday and I made Italian Vegetable Beef soup.
It was DELIOUS! I didn't have cabbage so I added some spinach and diced zucchini. I also use pink beans instead of kidney beans.


We always plan a little something sweet for dessert and I wanted to present my treats in a special way. I made a little treat box for each teacher with 3 chocolate squares inside. I thought maybe they could store paper clips or something inside when the candy is gone.


Each member had their initial on the top of the box for a little personal touch.
I used 5805 – Mini Journal Box Dies for the box, frame and butterfly. The letters are from 
5562 – Journal Letter Die Set and I held the little boxes closed with 5967 – Hook & Loop Fasteners.
The pretty little leaves and flowers are an old freebie die set from Art Impressions.
Everyone thought these were just the cutest thing!

I hope you're inspired to do something a little sweet for someone that you care about.
Enjoy your day and do something kind or crafty!


Thursday, January 25, 2024

Bee and Butterfly Mini Boxes from Art Impressions

Did you guys see the awesome little box die set that was just released?
It couldn't be cuter and I can't wait to make more.
The set is 5805 – Mini Journal Box Dies and it comes with 11 dies.


I always notice AFTER I've edited and added photos that there's yet another dog hair stuck to my project...sorry.


These little boxes are going to be so perfect for so many things!
They measure about 2 3/4" L x 2 1/4" W x 7/8" H
(Just under 7cm L x 5.8cm W x 2.2cm H)


Of course I was THRILLED to see this sweet little bee die included.  There are so many pretty dies included with the template to personalize and embellish your boxes.


For my second box I used cream cardstock and metallic gold paper which is not fun to photograph. If anyone has any tips...let me know.  This time I added the butterfly to the top.  It's tough to see but there are black rhinestones on his body and his wings are popped up to add dimension.  I measured the top of the box, cut a panel to fit and then embossed it.


I also used the other filigree die on the front of this one.  I'm not sure which is my favorite.
Also, are those Laurel branches?  I feel like I should know and that's the what they're reminding
me of.  The die is straight but I was able to easily bend them.  I'll bet they could be used to create a pretty wreath on a card too.


These were so easy to make and came together quickly. I'll be using this little set ALL the time!


Thursday, October 12, 2023

Give Us a Fright Challenge from Art Impressions

 Hello Ai fans!

The new challenge at Art Impressions is

Give Us a Fright!

Halloween is creeping up quickly and will be here "Boo-Fore" you know it.

I created a card and three lanterns for you today.  All are "see through" and have a battery operated candle to illuminate them.  We'll start with the card.  I kept thinking "Turn out the light, and give us a fright."  That's what inspired these projects.  There will be links to everything at the bottom of my post.


The idea for this card began last year when I received the Web Dies set.  I was so anxious to use them that I didn't even cut them apart. I just die cut the entire thing as is. I really kind of liked the look of the negative space and decided to hold onto it.


I always save good packaging from things I buy because they come in handy for clear cards.  This one is from an embossing folder I think.  I trimmed it down and glued the black piece to it.


I then used my5063 – Rectangle A2 Double Stitched Dies to cut out a frame so that light would show through.  I glued the black cut out piece to the card base and then I just added back in all the little webs and spiders and jack-o-lanterns.


I used the new Frog FB image since he does show through a little bit on the inside of the card.  Isn't he cute?!


I can just picture this on my mantle or coffee table when the lights are all out and we're watching scary movies.  So much fun!  


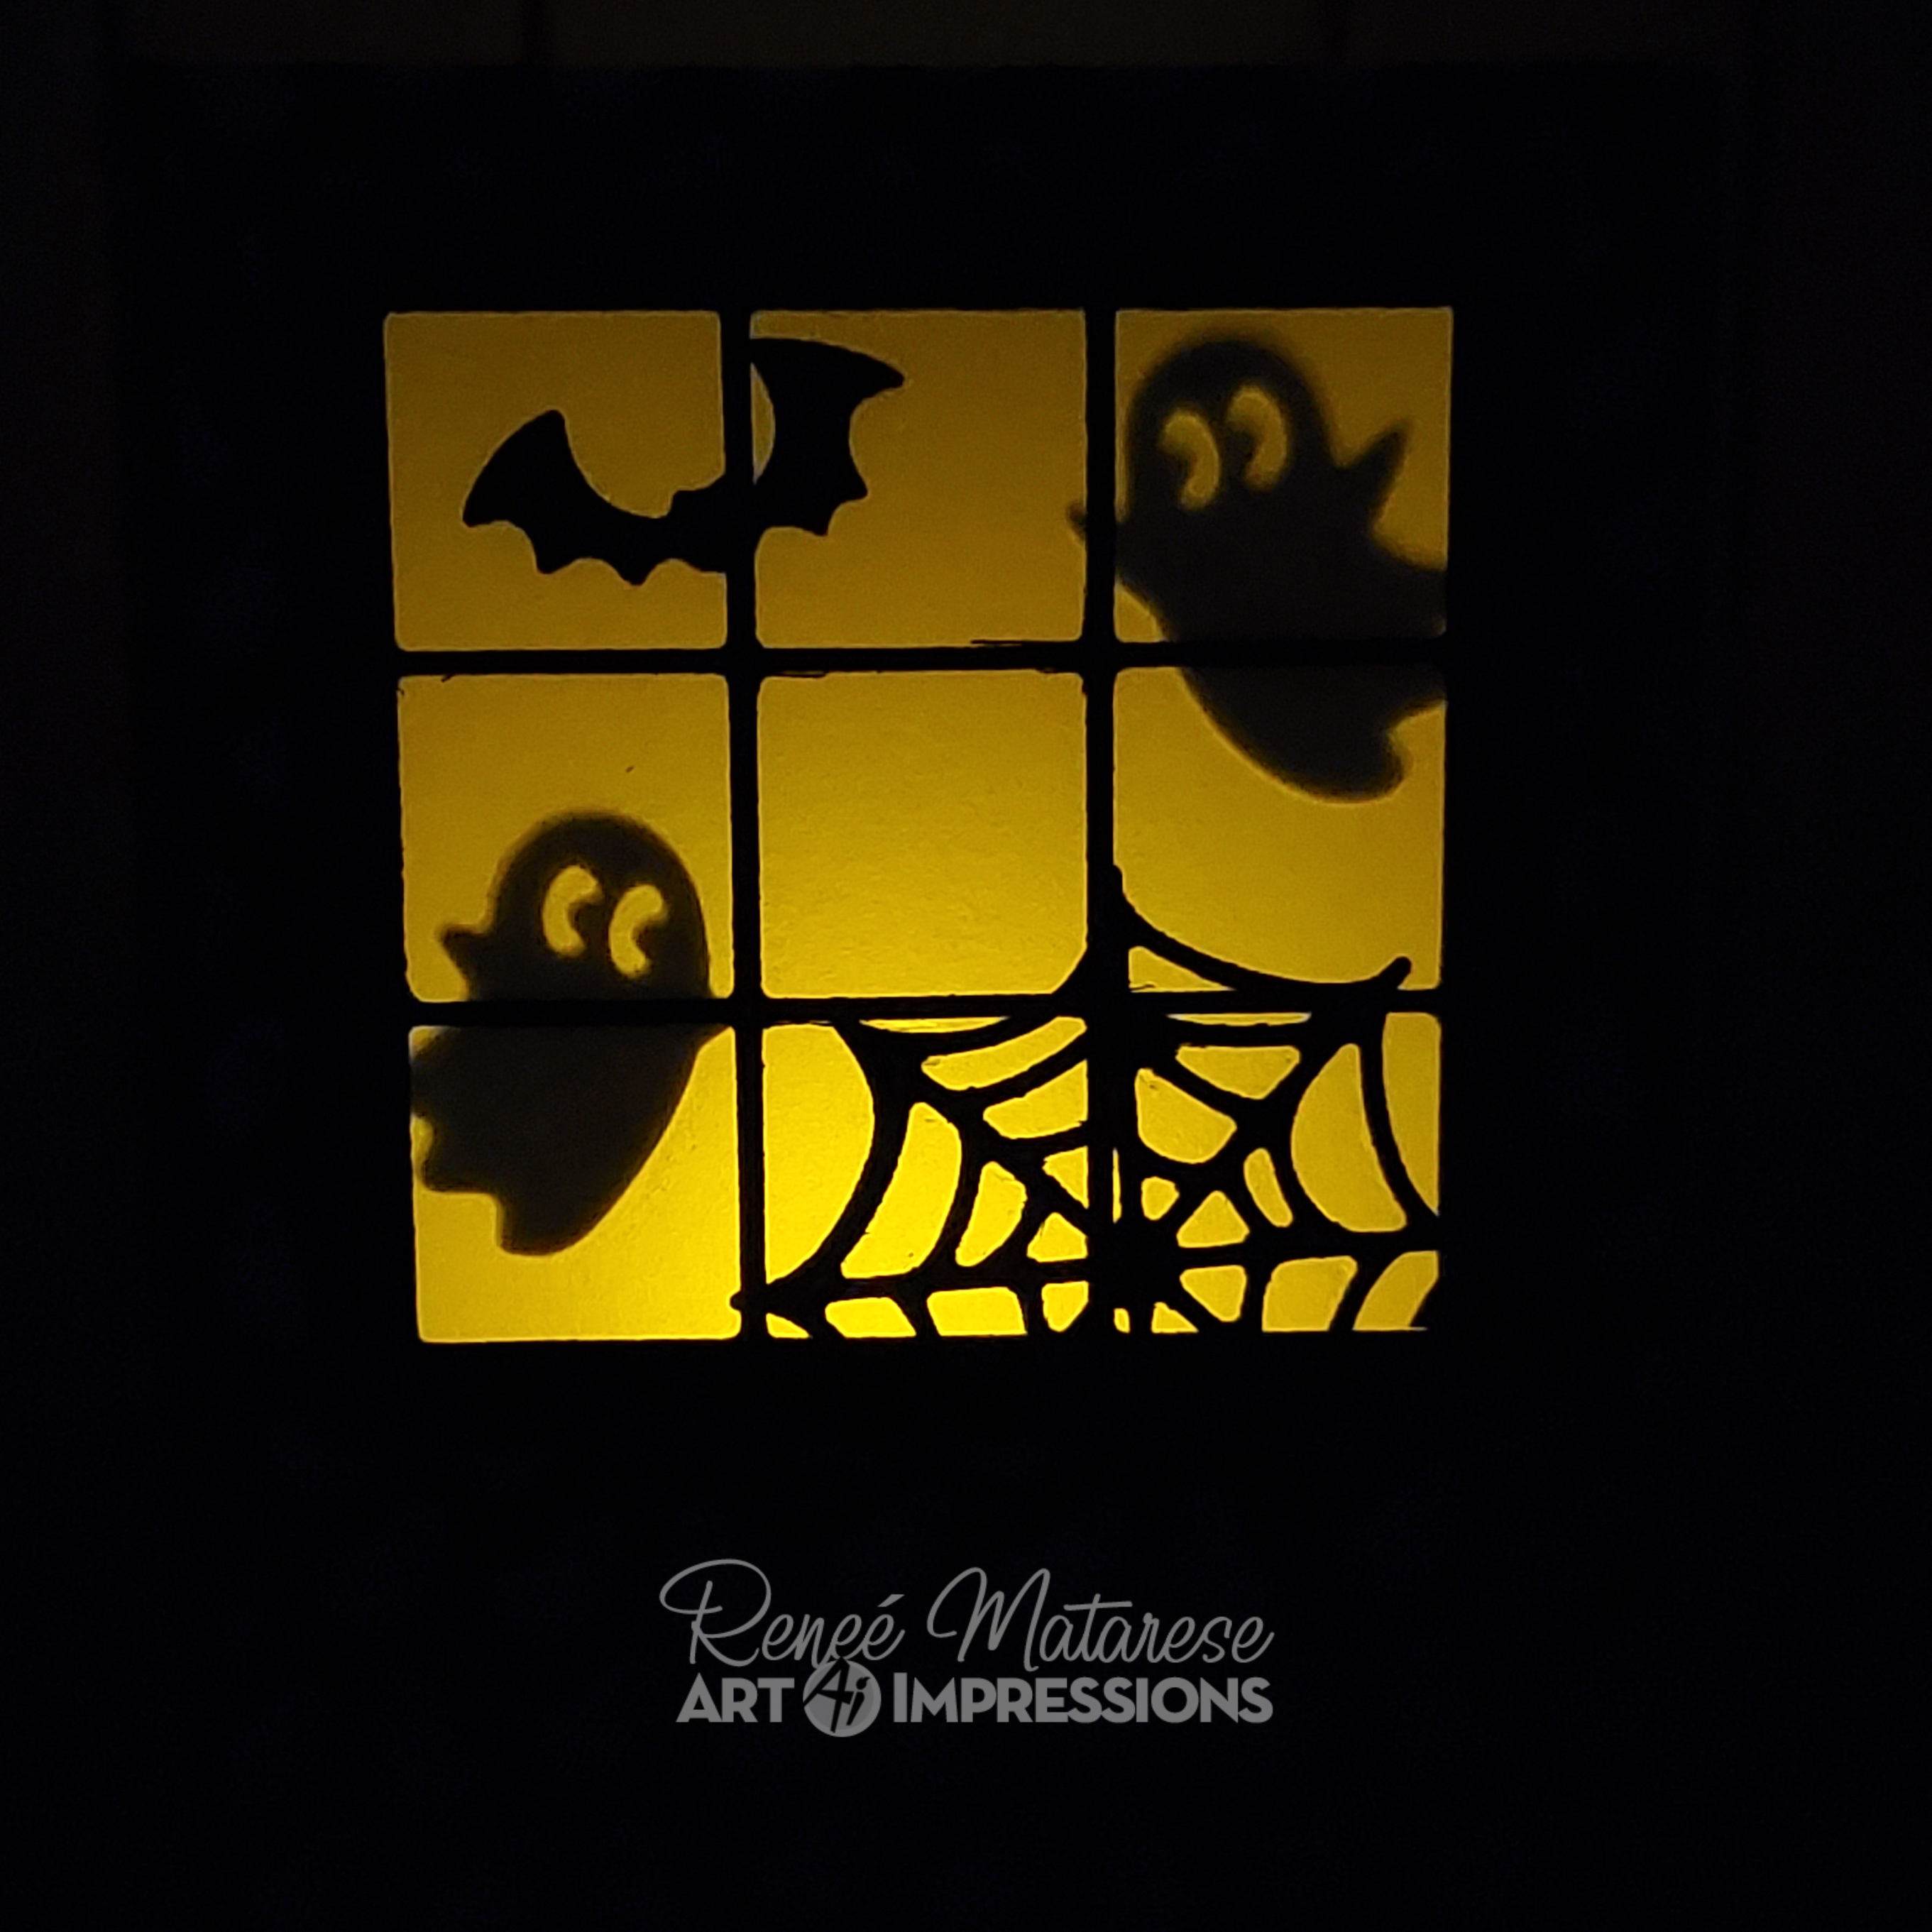
Next up I have three very similar lanterns,  yet each one is unique.
This one was done with all dark papers for my son.

   
This was such an easy process.  I have a few quick instructions and photos to help you out.  The cool thing about these is they fold flat if you want to store it for next year.  You can mail it flat too but you'd need a box if you wanted to include the light with it.

Here are the beginning steps.  I felt the rest were pretty self explanatory so I didn't take photos.

1. Cut a base cardstock to measure 4"x12" I used one that was black on one side & green on the inside.

2. Draw a line with your ruler about 1 5/8" from what you plan to be the bottom of the lantern.  This will keep all of your windows lined up and level.

3. Score your paper at 2 3/4", 5 1/2", 8 1/4" and 11"  (You'll then trim off about a 1/4" of what's left after the 11" score mark so it doesn't show through the window when you glue it shut.  You just need enough left to hold your tape or glue.

4.Glue on your patterned paper panels which should measure 2 3/4" x 4"

5. Use the window opening die from 5408 – ShadowBox Window Die to cut the 4 windows.

6. Cut the windows with the panes in them and glue them on.

Here's what I don't have photos for...

7. Glue vellum pieces to the inside of the lantern to help filter the light and give you something to glue all the little die cuts to.

8. Glue on all of your decorative pieces.


They look so adorable all lit up with the little critters and creatures peeking out and lurking about.


Then I created two more for my daughter and for Art Impressions. I used orange and white paper for Art Impressions and the lighter flip side of the paper that I used on my son's to make my daughter's.


All of the patterned papers are from Art Impressions new 5849 – Halloween S2 Paper Pack except for the black paper with silver stars.


Now...let's light them up.  I just LOVE these so much!
I may need to make another one for myself.


Inside is a little battery operated tea light that can be switched off when you're not using it.


Sunday, July 22, 2018

See you at noon!

Hello Ai fans!

Today I'm sharing a fun card I made with the


This adorable set contains 7 verses, 3 chicken images
and 1 set of chicken tracks.

I'm not sure what this type of card fold is called but I thought it was cute.
My paper is from a pad I just got at Hobby Lobby.  I love the country patterns in this pad. They're just perfect for this stamp set.


Copics used:
R32, R37, YG07, YG09, E31, E33, E40,
B01, T1, T3, C00, Y32, Y38